
Absolute Easiest Way to Sew Pillow Corners
Pillows, collars, and cuffs are just a few of the areas where corners need to be sewn. Cast aside the traditional technique and incorporate the “absolute easiest way” to handle sewing corners.
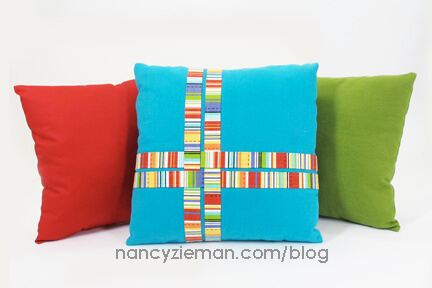
A complete sewing tutorial to create the blue lattice pillow (shown above) can be found here. It includes an envelope pillow back and wrapped corners. Today we are focusing on the wrapped corners, which can be easily applied to any pillow project.
Traditional Corner Technique
Stitching a corner seems obvious—stitch along the seam allowances to the corner, pivot, and turn.

The stitching is easy, the result is often a bulky, non-crisp corner when turned right side out. Why? The bulk of the seam allowance is inverted when turned to the inside. Use the following techniques when stitching for guaranteed crisp corners.

Absolute Easiest Way to Sew Corners: This method will produce a crisp corner and is every bit as easy to sew as the traditional method. Nancy has demonstrated this technique before as it applies to collars on Sewing With Nancy, Part Two of The Absolute Easiest Way to Sew Series.
Pillow Corners:
- Pin fabrics, right sides together. Stitch side seams using the suggested seam allowance

- Trim one of the seam allowances at each corner, if using heavy-weight fabric. Trim with rotary cutting tools or scissors.


- Fold the fabric along the stitch line at each corner; pin.

- See the fold up close:

- Stitch the seam, starting at the fold.

- Sew completely to the other end.


- Leave a 4″–6″ opening in the seam on one side of the pillow.

- Turn the pillow right side out . Use a Point 2 Point Turner by Clover to form the corner.
 .
.
- Insert fiber fill into the opening and hand sew the pillow closed.

 To make washable and removable pillow covers, consider making the envelope pillow back detailed here. Nancy also used the wrapped corner technique to create the pillow in that blog post.
Watch Absolute Easiest Way to Sew (Part One, Part Two, and Part Three) on The Best of Sewing With Nancy.
![]()
Happy Sewing,
Team Nancy Zieman
Nancy Zieman Productions, LLC.
![]()


Candice
I’ve seen several methods to make those corners, but – as always – I love your method! Sometimes you have to see something more than once before it applies to you and that lightbulb goes off! Thanks!
Bev Hancox
I have been using this method ever since I first read it on your post and it has made my life so much easier. thanks for all your tutorials.
Joyce Fitzgerald
Really makes pillow making easier, now I enjoy making pillows for my friends, they make great gifts.
Jodi Bowlden
Brilliant!
Kim H
It is so funny Nancy! Today I taught a lesson on an #Ovation #Babylock for a new owner and I taught her this very method! I even said “This is the method Nancy Zieman likes to use!” It is a winner in my book!
Chris
This I got but could someone please tell me how to join the ends on trim for pillows. Not piping, I know that one, but odd trims, the fancy ones.
Cecilia
I have read about this method of corners, somehow have not used it, but will try it the very next time I sew corners. Thanks Nancy for all the sewing tips, makes our life so much better, big hugs.
Connie L. Dove
Love watching programs about quilting. Love the different patterns. makes me continue on with my quilting. got started later in life – after I retired – but love it. Enjoy your programs on Sat am with my first cup of coffee for the day.
Connie L. Dove
Pam Corder
Years ago, I read in one of your sewing books about how to cut the fabric different at the corners so that the corner of the pillow wouldn’t stick out so far. I have so many of your sewing books & can’t find it. I’m fixing to make some decorative pillows with some very expensive fabric for my daughter & would hate to mess them up. Can you please help me? Sincerely, Pam
Nancy Zieman
HI Pam, Here’s a link to the pillow corner tutorial and more! http://www.nancyzieman.com/blog/pillows/