
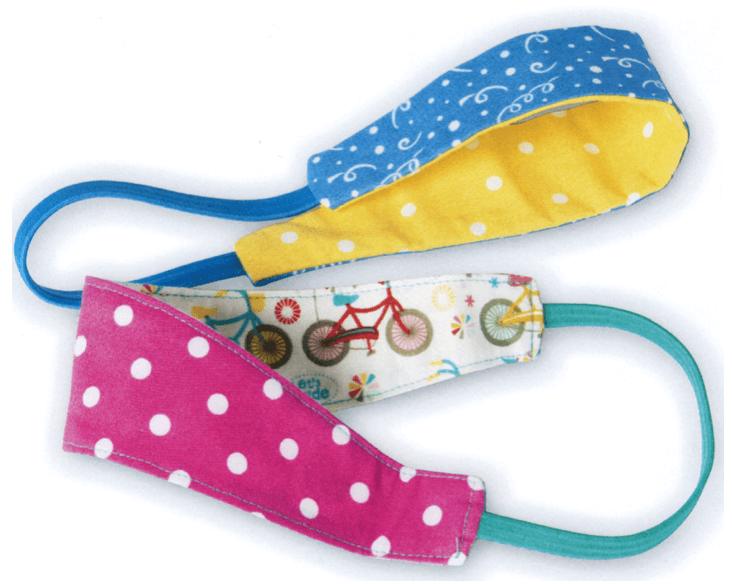
I Sew For Fun Project Tutorial: Reversible Headband
Sew a reversible headband that is both practical and adorable—it keeps hair in place, while making a fashion statement! Ask your little sewing partner to choose two cotton fabrics and let the stitching begin with this FREE! I Sew For Fun Reversible Headband Sewing Tutorial by Nancy Zieman.

Tune in and watch Nancy and her granddaughters, along with friends, take a modern approach to sewing. Nancy shares her team sewing-for-fun experience along with many tips for a big partner, and numerous insights for involving a little sewing partner—all while making simple, easy to sew kid-friendly projects. Watch I Sew For Fun on Sewing With Nancy!

Reversible Headband Sewing Tutorial
Approximate Finished Size: 11″ x 2″
Supplies Needed:
- Two 4″ x 15″ fabric rectangles (Cut one of Fabric A and one of Fabric B.)
- Coordinating elastic headband OR 1/3 yd of 1/4″ wide elastic
- Two 4″ x 15″ strips Pellon Sof-Shape Fusible Interfacing
- Coordinating all purpose thread
- One 1/4″ x 3″–4″ strip double-sided Pellon EZ Steam II fusible web.
Handy Notions:
- NEW! I Sew For Fun Clip ’n Glide Bodkin by Nancy Zieman for Clover
- I Sew For Fun Wonder Clips by Clover
- I Sew For Fun Point 2 Point Turner by Clover
Instructions:
Please read all instructions before beginning. Use the right edge of the presser foot as the depth of the seam allowance.
1. Fuse Pellon Sof-Shape interfacing to wrong sides of Fabric A and Fabric B, following manufacturer’s instructions.
 Fuse and cut out pattern pieces in advance. When your little partner arrives, you’re ready to sew!

2. Create your own pattern shape for a headband from a 2-3/4″ x 11.5″ rectangle of pattern making paper. Taper and round ends as desired. Cut out.
3. Cut out headband pieces from Fabrics A and B, using paper pattern.

4. Prepare and stitch elastic headband:
- Mark the elastic headband (or elastic) about 8 1/2″ from one end.

- Place “marked end” of elastic headband in the center of one short edge of the headband, right sides together, and cut edges even; pin in position. Stitch elastic to the short edge of the headband.


For ease in turning the headband later, now’s the perfect timing to attach the I Sew For Fun Clip ’n Glide Bodkin to the un-stitched elastic end!
5. Prepare and stitch fabric headband:
- Place headband pieces right sides together, matching cut edges and sandwiching elastic in between. Pin or use Wonder Clips to secure the long edges.
- Stitch one long edge of the headband, using the right edge of presser foot as depth of the seam allowance, removing pins or clips as you come to them.
 Show your little partner how to use Larry the Presser Foot Lifter to position fabric under the needle, how to guide the fabric along the edge of the presser foot, and how to use the Backup Bernie Button at each end to secure stitches. Okay, now it’s the little partner’s turn to do some stitching. It’s OK to hover over them in the beginning.
- Stitch the opposite long edge of the headband, leaving an opening about 3″–4″ long on the edge closest to the elastic tail.

6. Prepare seams on short ends of headband and encase elastic:
- Wrap seams toward the center at the short end of headband (edge with attached elastic), folding along the stitching lines; press.

- Stitch the first short end of the headband encasing the elastic end.
- Wrap seams on the second short edge (elastic tail end) toward the center, folding along stitching lines.

- Pull the elastic tail until the 8 1/2″ marking on the elastic is visible at the edge of the headband. Place a pin through the headband and elastic tail to hold in position.

- Machine baste across the short edge of the headband, catching the elastic tail. Check the fit of the headband, turn it right side out and have the little partner try it on. Release the seam and adjust the length of the elastic if necessary. Restitch the seam. Clip the elastic.

7. Finish the headband:
- Pull the elastic through the opening in the fabric to turn the headband right side out.

- Use a Point 2 Point Turner to flatten seam allowances inside the headband, and to push out the corners

- Press headband, folding in the seam allowances at the opening.
Teach your little partner how to bring out a corner with the Point 2 Point Turner. Then you’ll do the folding and pressing.
- Place a small 1/4″ x 3″ – 4″ strip of Pellon EZ Steam II fusible webbing in the opening at the long edge of the headband. Press; remove paper. Press seams together.

- Topstitch around headband, pivoting at corners and stitching over seams on short ends to reinforce elastic.

You may want to complete this step, but if your little partner feels comfortable sewing, let them “have at it!”
Tune in and watch Nancy and her granddaughters, along with friends, take a modern approach to sewing. Nancy shares her team sewing-for-fun experience along with many tips for a big partner, and numerous insights for involving a little sewing partner—all while making simple, easy to sew kid-friendly projects. Watch I Sew For Fun on Sewing With Nancy!
Watch I Sew For Fun on Sewing With Nancy online at NancyZieman.com.

Fins I Sew For Fun companion sewing tools by Nancy Zieman at ShopNZP.com.

 To win a NEW! I Sew For Fun Clip ’n Glide Bodkin from Clover, please leave a comment below sharing a sewing project you’ll be stitching with your little sewing partner.


The randomly selected winner of a copy of Quick Column Quilts by Nancy Zieman from F+W Media on the March 30 blog post is Barbara Gearin.

Her comment is: This book is really a winner. My 42 year old daughter wants to learn to quilt and this is the new clean lined stuff the young love.
Happy Sewing,
Team Nancy Zieman
Nancy Zieman Productions, LLC.
![]()


Candy Abel
I do sew with my great niece and I can see the ease of using Clover’s new tool. Hope we win!
DebbieW
The perfect sewing project to be stitching with my little sewing partner would be the headband.
Joyce Migliore
I would love to make the headband with my little sewing partner!
Clovis
She looks so cute with her headband.
Shirley Clark
My little granddaughter, Shelby, has been asking to make some head bands. These are perfect!
Ann Marie Oblas
I am teaching nieces how to sew. They love these headbands and they have started choosing material. Thanks for the detailed instructions!
Barb K
I think my 11 year old Granddaughter would enjoy learning to make these headbands–cute project!!
Kar
I will be stitching a Super Hero cape with my little grandson.
Caryl Dobbe
My 2 ten year old granddaughters and I will Stitch these hair bands. They love to sew and we’ve made quilts for their dolls from charm squares I always send them in my letters.
Gail Beam
I think a pillowcase will be the project I would like to make with my granddaughter.
Cindy K
My 3 granddaughters would like the headband and they would enjoy helping me make them
Rosie
I have material to sew pillow cases with my granddaughters. That’s my plan now
Chris
What a wonderfully practical yet simple first item to teach our granddaughter to sew! She can make a headband in her school colors, and learn about elastic, measuring with stretch, turning inside out with a bodkin and how to topstitch at the same time. She will love it!
Eileen
This is something I want to try with my 8 year old granddaughter. I introduced her to sewing last fall and she loves it!
Thanks for a chance to win!
Sharon
Great project for my 3 granddaughters…one granddaughter is already hooked on sewing now just the project to get the other two interested. Thanks for the project and instructions.
Linda Weinberger
I would love to make the headbands. They would look great with her curly hair.
Susan
Sewing this charming headband with my granddaughter would be joyful. Picking out “special” fabrics together would be part of the fun!
Carolyn T
Sewing with children in mind is such a delight. Change up the fabric and shape and we’ll have a superhero headband! Love the bodkin.
Lisa
I am planning on making this headband as well as a pillowcase with some nieces!
Angela Mo
Love the instructions. Easy to follow. Our first project mum and daughter ❤