
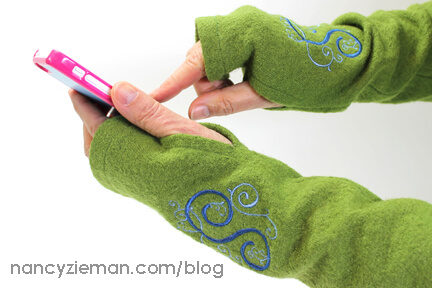
Stay Connected and Warm with Texting Gloves
Smart phones aren’t just for teenagers and business professionals. It seems everyone is connected through their smart phones and devices these days. Of course, when cooler weather comes, we are faced with the dilemma of staying connected with our gloves off or staying warm with our gloves on. Peculiar, right? I have developed an easy solution—texting gloves. Use fleece scraps to make a comfy pair of fingerless gloves in an evening of sewing. Or, spend a little more time to embellish the gloves with a monogram for an added personal touch. In either case, these make up quickly and solve a common seasonal problem.
This technique can easily be adapted to knit tops, fleece jackets, and active wear to create the popular “thumb-hole” style at the end of each sleeve.
![]() Small pieces of fleece fabric are ideal for the quickest of all fleece accessories. There are really only three steps: cut, stitch, and turn.
Small pieces of fleece fabric are ideal for the quickest of all fleece accessories. There are really only three steps: cut, stitch, and turn.
Notions, Fabrics, and Supplies
- 1/2 yard high-loft fleece
- Matching all-purpose thread
- Pattern Tracing Paper
- Non-Permanent Marking Pen or Tailor’s Chalk
- 1/2″ wide Fusible Web
- Sticky-Back Tear-Away Stabilizer
- Wash Away Avalon Film Stabilizer
- Madeira Embroidery Thread
Cutting Directions
Prepare the Pattern
- Using Pattern Tracing Paper, trace a 12″ x 14″ rectangle with the grain running the 14″ length.
- Measure in 1″ from each edge along one 12″ side.
- Draw a line from the point to the other 12″ side, tapering the pattern.
- Mark a 1″ seam allowance along the 14″ edges.
- Mark a thumb opening 2″ and 4-1/2″ from the narrower end of the glove.

- Pin pattern to high-loft fleece and cut two.

- Transfer seamline and thumb opening marks with nonpermanent Marking Pen or Tailor’s Chalk.

Texting Gloves Embroidery (optional)
There are two schools of thought on monogramming gloves or in this case, texting gloves: The monogram can either face outward or inward. I chose the outward option.
How to Monogram on Fleece
- Attach embroidery unit.
- Determine the embroidery design and transfer the design to your sewing machine.
Note from Nancy
I used a font found in Personalize ‘N Stitch 2.0 and scrolls from the Delightful Daisies Collection.
- Place a marking or embroidery-positioning sticker 4-5/8” from the top and 3-1/2” from the right side. On the opposite glove, use the same measurements, marking from the left side.


- Perforate the stabilizer inside the hoop with a tip of a pin. Tear away the paper covering.

- Place fabric on the stabilizer, centering the marking or placing the stickered area in the middle of the hoop.

- Move the needle to begin stitching over the mark or sticker. Remove the sticker.
- Place a Wash Away Avalon Film Stabilizer over the fabric.

- Embroider the design.
- Tear away the excess wash-away stabilizer and gently tear the fabric away from the sticky-back stabilizer. If any residue of the wash-away stabilizer remains, spritz the fabric with water and the stabilizer will vanish.
Construct the Gloves
This series of steps features photography for the left-hand glove.
- Clip to seam allowance at marked thumb openings.
- Fuse a 2-1/2″ strip of Fusible Web at the ends of the clips as pictured.

- Remove the paper covering from the strip. Turn under the seam allowances and press.

- Stitch the seam allowances in place.


- Press a 5/8″ hem at the top and bottom edge of the glove.

- Meet the long edges, right sides together.

- Stitch a 1″ seam with a basting stitch, using caution to not stitch the thumb area.
- Try on the gloves and adjust the seam width, if necessary, to fit your hand/wrist.

- Restitch the long seam, reinforcing the thumb area before and after the opening.

- Fold the 5/8″ hem along the marked crease, topstitch.
- Turn gloves right side out.

Watch Sew Knits With Confidence on Sewing With Nancy online
 The randomly selected winner of a copy of The The Perfect T-Shirt Pattern from Pamela Leggett is Terry.
Her comment was, “I live in knits. I have had some strange results when trying to alter T-Shirts. This pattern/book would really help. Thank you for the giveaway.”

Bye for now,
![]()
Content in this feed is © copyright 2017 by Nancy Zieman and may not be republished without written permission. You’re welcome to forward the email to a friend or colleague but it’s not okay to add the RSS feed automatically as content on a blog or other website.
The FTC requires us to tell you that Nancy Zieman has provided products by other companies in the course of her business. The FTC requires us to advise you to take this information into consideration when reading this posting.


Clovis
Will have to try these gloves.
Maureen. Bearb
Love this!
Maureen. Bearb
Great idea. Could use this.
Linda
I’ve been looking for a no finger glove pattern. Thanks
Alice R Watts
These would make great yoga gloves. Thank you.
Sandi
Great items! Very handy for Arthiretic hands!
Gail Beam
My hands are always cold! These look fantastic!