
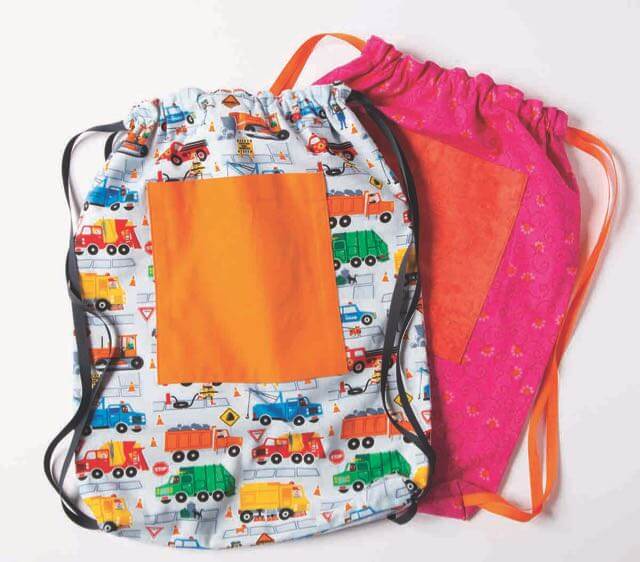
I Sew For Fun: Drawstring Backpack
Make a sewing date with the kids in your life and sew this adorable backpack with your little partner. It’s perfect for bringing cars and trucks or stuffed animals and pjs to grandma’s house. This backpack is one of twenty easy sewing projects featured in Nancy Zieman’s new I Sew For Fun Book
Approximate Finished Size: 13″ x 17″
Supplies Needed:
- 1/2 yd. Fabric A—backpack outer panels (Directional print or stripes may require additional yardage.)
- 1/2 yd. Fabric B—backpack lining
- One 8″ x 10″ rectangle Fabric C—patch pocket
- 3 1/2 yd. 3/8″ wide grosgrain ribbon straps
- 1/2 yd. 1/4″ wide double-sided fusible web tape, such as Lite Steam-A-Seam 2
 Instructions:
Please read all instructions before beginning. Use the width of the presser foot as the depth of the seam allowances.
1. Prepare and cut fabrics.
- Press and straighten fabrics.
- Use a rotary cutter, ruler, and mat; cut:
– Two 13 1/2″ x 17 1/2″ Fabric A rectangles for backpack outer panels.
– Two 13 1/2″ x 17 1/2″ Fabric B rectangles for backpack lining.
2. Finish pocket lower edge and sides.
- Measure and mark 1″ from pocket lower corners.
- Fold corners to inside at marks.
- Fold in 1/2″ on lower and side on lower side edges of pocket; press.


![]()
You just made beautiful mitered corners with hardly any effort!
3. Finish pocket top.
- Fold and press 1″ to wrong side at top edge (8″ edge) of pocket.
- Fold over and press another 1″ to wrong side at top edge of pocket, hiding raw edge.
- Stitch, guiding presser foot along inside fold.
 4. Stitch pocket to outer panel of backpack.
- Fold the pocket to outer panel of backpack in half, to find centers. Pin at upper edge of centers.
- Center and pin patch pocket, right side up, with upper edge of pocket approximately 4″ from upper edge of backpack panel.
- Stitch sides and lower edge of pocket, guiding fabric along edge of presser foot, and pivoting at corners. Backstitch to reinforce top edges of pocket.


![]() Show how to pivot at corners by keeping the needle in the fabric, lifting Larry the Lifter, pivoting, lowering the lifter, and continuing stitching. Your little partner can try it on the second corner.
Show how to pivot at corners by keeping the needle in the fabric, lifting Larry the Lifter, pivoting, lowering the lifter, and continuing stitching. Your little partner can try it on the second corner.
5. Assemble the backpack.
- Stitch upper edges of lining and backpack panels:
– Place backpack front and lining right sides together, aligning cut edges. Make sure patch pocket opening faces upper edge.
 – Stitch across upper edge. Press seam flat, then open.
– Stitch remaining backpack panel to remaining lining panel in the same manner. Press seam flat, then open.

- Stitch sides and lower edge seams:
– Place backpack front with lining and backpack back with lining right sides together, matching outer panel fabric and aligning cut edges. Secure with pins.
– Use a measuring gauge and an erasable fabric marking pen or pencil to mark 1″ from upper edge seam on both backpack and lining panels.
– Stitch backpack outer panel beginning at the 1″ mark at upper edge of side seam, guiding presser foot along edge of fabric. Pivot at corners to stitch lower edge and remaining side seam. Stop stitching at 1″ mark on opposite side seam. Remember to backstitch at beginning and ending of stitching.
– Stitch lining beginning at upper edge (1″ mark) of side seam, leaving 3″ open for turning. Pivot at corners to stitch lower edge of and remaining side seam. Stop stitching at 1″ mark on opposite side seam. Remember to backstitch at beginning and end of stitching.


- Mark and cut corners:
– Use a measuring gauge and erasable fabric marking pen of pencil to mark a 1″ square in lower corners of backpack outer panel and lining.
– Cut squares from lower corners of backpack outer panel and lining.

 6. Clean finish casing openings.
- Cut four 1/2″ lengths of double-sided fusible web tape.
- Position tape on pressed upper edge seam allowances on front and back of backpack.
- Fold side seam allowance over tape and fuse following manufacturer’s instructions.


7. Close opening in lining.
- Turn backpack right side out.
- Turn in seam allowance at opening; press.
- Cut double-sided fusible web tape the length of opening. Place tape on seam allowance and fuse following manufacturer’s instructions.
 8. Complete casing.
- Insert lining into backpack.

- Press upper edge before stitching casing.

- Complete one continuous line of stitching approximately 1-1/8″ from upper edge of backpack to form lower edge of casing.
- Edgestitch upper edges of backpack front and back.
9. Add drawstrings to bag.
- Cut two 60″ lengths of ribbon.
- Using bodkin or safety pin, thread ribbon through front casing beginning at right edge, then through back casing at left edge. About 17″ of ribbon should remain at right edges of both front and back casing.
- Using bodkin or safety pin, thread ribbon through front casing beginning at left edge, then through back casing at right edge. About 17″ of ribbon should remain at left edges of both front and back casing.


![]() Make sure ribbon drawstrings do not twist in casing.
Make sure ribbon drawstrings do not twist in casing.
- Match cut edges of ribbon emerging from right edge of casing to center of gusset opening at lower right edge of backpack; pin.
- Match cut edges of ribbon emerging from left edge of casing to center of gusset opening at lower left edge of backpack; pin.
- Secure ribbon ends and turn backpack inside out.


10. Form gussets and complete bag.
- Align cut edges of square-cut corner openings, matching edge of side seam to lower edge seam.
- Remove pins from inside. Pin on lining side to secure ribbon edges with seam allowance.
- Stitch seam through lining, ribbon ends, and backpack outer panel fabric to form gusset.
- Finish cut edges with zigzag stitches.

- Turn backpack right side out.

Visit other I Sew For Fun Related Blog Posts and watch
I Sew For Fun on Sewing With Nancy
- I Sew For Fun Part One: One-Button Projects
- I Sew For Fun Part Two: Two-Button Projects
- I Sew For Fun Part Three: Three Button Projects
- The Flying Sewing Machine Children’s Book by Nancy Zieman
- Click Print Stitch Software by Designs In Machine Embroidery (DIME)
- Amazing Designs Snack Shop Machine Embroidery Collection
- I Sew For Fun Blog Hop with Nancy’s Blogger-Friends

For a chance to win a copy of the I Sew For Fun Book from Nancy’s Notions, please leave a comment below sharing which project from the book you will be stitching with your little sewing partner.
Happy Sewing,
Team Nancy Zieman
Nancy Zieman Productions, LLC.
![]()


Gail Beam
The pillowcase, because both boys and girls love to have special pillowcases and they can pick out their own fabric at the fabric store. A simple project that will teach them how to thread and use a sewing machine, measure fabric, and cut out their project.
Christine Giliberto
My grand daughter and I are looking for summer sewing projects that we can also use as a community service project as well. The backpack with a special pillow case tucked inside would be a welcome gift for children who have suffered a loss due to fire, accident or family strife.
L Watson
Well, I don’t have grandkids yet. However, I like the backpack idea that could be sent in care boxes that my daughters and I do at Christmas-time. I could see making them with my older daughters, which I would like very much.
Cindy Schultz
I’m pretty sure my grandson would love to help make this backpack when he is just a bit older.
Stella Neltner Volmer
I would love this. My six year old granddaughter and I are looking for sewing projects for the summer. She is very interested in sewing and excited to learn. We have just gone to the fabric store and picked out fabric to sew s pillowcase. This was what my grandmother used to teach me to sew. Seemed the best place to start. It would be awesome to have more projects to get her comfortable with sewing and eventually move on to making clothes for herself.
Debi P.
I learned to sew from my grandmother. My mom didn’t like sewing. My daughters didn’t like sewing. My granddaughters love it as much as I do. The live quite far away from me, so I’m always trying to find simple projects they can do on their own. The joy on their face is so beautiful when they send me pictures of completed projects. This book would be an awesome gift for them.
Chrissie
On a recent visit to see our grandchildren (and their parents, as well), I showed our 6 year old granddaughter how to sew a pillowcase. She was so excited to learn that she made two for herself and two for her brother–picking out the coordinating fabrics for all of them! When we visit in a few weeks, I think she might like the idea of sewing a quilt for her AG dolls or perhaps even this backpack. What fun, and memories, too!
Margaret Scott
Would love to make the backpack with my sewing partner, my great niece.
judy
Have invited my great granddaughters to come to my house for some sewing fun. I think they might enjoy this backpack as well as the pillow case and O know the owl pillow. Of course we’ll have to do some simple clothes too. I looked for this book but everyone is out. I did get the Flying Sewing Machine.
Beverly
My grandmother’s treadle machine was my first sewing experience and I would love to teach a granddaughter to sew myself. I think the owl pillow looks so cute, but the carryall for notebooks and pens might be a more practical first project.
Clovis
No little one now, but would be great to make as gifts.
Barbara Howes
The drawstring bag looks like a perfect machine project for my granddaughter! She’s just beginning to sew with me, and it’s important that she have successful experiences with her first attempts. What fun!
Joanie Wallrich
My 8 year old granddaughter is starting to sew and Nancy’s I Sew For Fun Book would be perfect for her to begin with. It will give her easy instructions to make lots of useful things. Right now she is sewing a lot of doll blankets. We would start with a pillowcase and then I would let her pick something after that. It’s sad to think that there will be no future children’s sewing books, I miss Nancy and feel sad for her young granddaughters.
Laura Gilbert
I would like to sew the drawstring bag with a grandchild when I’m blessed with one!
Noreen
The drawstring bag looks like a great starter project because they can use it to carry their things.
Louise Johnson
I want to make the backpack for my grandsons using leftover fabric from the aprons I have already made for them. They can use them when they visit their other grandmother who lives within a medium drive from them.
Jenny Moore
I would love to be able to sew with my Grandchildren.
Judy
I sew with my 8-year-old great granddaughter. She has had her own little machine set up in my sewing studio for 2 years. She loves sewing whether there is thread in her needle or not. I plan on helping her make the drawstring backpack first.
Janice Coty
Love the simplicity of this backpack.Another great idea for sending and filling the bags for special needs children.Will have to share with a ladie’s group. Thank-you Nancy for all you do,love your shows.
Max
What a fun project to try with the little ones. The three seam pillowcase has been a hit with the little ones.
Linda Johnson
I would make the back pack for two little boys in Cub Scouts. I would embroider both their name and troop name on the pocket. I would also sew the patches that these boys have already received. I would be able to engage them in choosing the fabrics, the thread colour for their names and the placement of their patches.
Sarah
I am not yet a grandparent but making these to put in shoe boxes around Christmas as a bag for the kids getting it to put there things in is a great idea! Great for both boys and girls.
Patty
My granddaughter got her first sewing machine for her 7th birthday. I am collecting books and patterns so that we can sew together. This would be perfect for her.
Karen
This looks like a fantastic book! I can’t wait to start sewing anything and everything with my twin granddaughters.